Saturday, January 3, 2015

What is the Difference Between Basic Disk and Dynamic Disk
बेसिक डिस्क तथा डायनमिक डिस्क में अन्तर


Differences Between Basic and Dynamic Disks:
Basic disks are supported (readable) by all Windows operating systems since MS-DOS.

Dynamic disks are only supported (readable) by Windows 2000, XP Professional, Windows Server 2003, Vista Ultimate, Vista Enterprise, Windows 7, and Windows Server 2008.

Basic disks can have up to 128 GPT primary partitions, or 4 MBR primary partitions or 3 MBR primary partitions and 1 extended partition with up to 128 logical volumes in the extended partition.

Dynamic disks can have up to 2000 dynamic volumes that function like a primary partition used in basic disks.

Basic disks cannot share or split data with other primary or logical partitions, or basic disks. Each partitiion on a basic disk is treated as if it was a separate hard disk on the basic disk.

Separate dynamic disks can be combined into a single dynamic volume (spanning), split data among several dynamic disks (striping) for increased performance, or duplicate data among several dynamic disks (mirroring) for increased reliability.

Hard disks are basic disks by default, including removable disks and disks on a laptop (notepad).


Removable disks cannot be converted to a dynamic disk.

Complete Tutorial On BCDEdit Command of Command Line Tool
बी.सी.डी. ईडीट कमाण्ड का कम्प्लीट ट्यूटोरियल

Information:

This will show you how to use BCDEDIT in the command prompt and avoid the need of third party applications like EasyBCD.

Note:

Bcdedit is a really powerful tool that Windows Vista and Windows 7 uses to manage the boot loader entries.BCDEDIT needs a boot manager to boot your system.A boot manager is a file that contains necessary information that instructs the system how to boot/start an operating system.

>>>> Windows 7 and Vista boot manager file is \bootmgr
>>>> Windows XP boot manager file is \ntldr

BCDEDIT can support other boot managers too, like grub for Linux. You just have to place the boot file on the root of the boot manager partition. e.g. \grldr and you have a grub boot loader enabled.
Bcdedit edits a file called bcd , which is located in Windows 7's hidden partition under \boot\bcd.
In Vista, its located under C:\boot\bcd.

Warning:

You must be logged on in an administrator account to be able to do this tutorial.

To Use bcdedit:

1. Open an elevated command prompt.
2. Type bcdedit and press enter.
NOTE: By typing just bcdedit you just list your boot entries.

A boot entry consists of 4 main elements:
1. Identifier
The identifier is how the system has named the boot entry.
2. Device
The device is the drive or virtual image that the system will use to boot the boot entry.
3. Path
The path is the location on the device where the bootloader file is found.
4. Description
The description is the friendly name we give to our boot entry, e.g. "Windows 7" 

You see next to the identifiers their UUIDs in {}. The UUID is the unique codename that the system gives to each boot entry and cannot be changed.

The standard identifier UUIDs are explained below:

{bootmgr} = the boot manager
{current} = the OS you selected to boot at startup.
{default} = the default OS selected to boot the PC.
{ntldr} = Windows Legacy OS Loader (for windows xp)

There are others like {memdiag} or {ramdisk} but they can't be of much use right now.
   
Warning

IMPORTANT: 
make a backup of your bcd file first. To do that, type:
bcdedit /export C:\SAVEDBCD
This will create a file c:\savebcd which is your boot entry backup.

If you mess up, you can always undo changes by:
bcdedit /import c:\savedbcd
Now to see how we can control the above entries, here are some examples:

bcdedit /set {current} description "My edited Windows Boot Entry"
NOTE: This changes the title of the boot menu entry "{current}".

bcdedit /set {ntldr} device partition=E:
NOTE: This tells bcd that Windows XP partition is drive E:

bcdedit /set {ntldr} path \ntldr
NOTE: This tells bcd that the ntldr file which is the winxp bootloader is on root folder "\" (of drive e: as stated above)

bcdedit /displayorder {ntldr} /addfirst
NOTE: This places Windows XP as the first OS on the menu list.

 bcdedit /default {ntldr}
NOTE: This places Windows XP as the default OS to boot first with.

bcdedit /displayorder {33342343-3424-2342342342-2344} /addlast
NOTE: This tells bcd that the boot entry with UUID 3334... should be the last entry on the menu.
You can copy your existing VISTA or Windows 7 boot entry to another identical. Then you can change settings on the new entry to experiment. You will always have the first entry available, so it's safe to play with.

bcdedit /copy {current} /d "New Windows 7 boot entry I just copied!"
this will give you a line:
NOTE: The entry was successfully copied to {4c21825f-e04b-11dd-b760-00195b61617a}. The {4c21825f-e04b-11dd-b760-00195b61617a} is the UUID of the new entry that the system just created. Yours will be different than mine! This is its identifier and you should use this to address that entry. 

Example:
bcdedit /set {4c21825f-e04b-11dd-b760-00195b61617a} numpoc 2
NOTE: This adds the 2 CPU Core support during boot, like you do in msconfig.

bcdedit /deletevalue {4c21825f-e04b-11dd-b760-00195b61617a} numproc
NOTE: This deletes the numproc parameter from entry {4c21825f....}
bcdedit /delete {}

FEEL LUCKY..


HOW TO TYPE IN URDU IN WINDOWS 
विण्डोज में उर्दू में टाइप करना


STEP 1: Install Urdu Nastaleeq Font (Jameel Noori).
                Click Here to Download

STEP 2: Install Urdu Phonetic Keyboard.
               Click Here to Download

STEP 2: Enable Unicode Urdu in Windows Windwos 7 By

                Pressing ALT + SHIFT together


HAPPY URDU TYPING


Keyboard Layout


Download Urdu Keyboard Layout PDF Click Here


How to type in Hindi Under Browsers Click Here

How to Setup Urdu Typing in Windows XP Click Here

Type Urdu Online using keyboard or mouse Click Here

Convert from InPage to Urdu Unicode text Click Here

Download Urdu Fonts Click Here

Installing the Urdu Font on Apple Mac Click Here


How to Type in Hindi in Mangal Font
मंगल फान्ट में हिन्दी टाइप करना 
(TYPING IN INSCRIPT) 


STEP 1. GO TO CONTROL PANEL > CLOCK, LANGUAGE AND REGION


STEP 2. GO TO CONTROL PANEL > CLOCK, LANGUAGE AND REGION

STEP 3. GO TO KEYBOARDS AND LANGUAGE TAB THEN CLICK ON CHANGE KEYBOARD BUTTON.


STEP 4. CLICK ON ADD BUTTON


STEP 5. SELECT AND CHECK HINDI > KEYBOARD > DEVANAGARI - INSCRIPT AS SHOWN BELOW THEN CLICK OK AGAIN OK.


STEP 6. AFTER THAT KEYBOARD WILL BE VISIBLE AS SHOWN BELOW, CLICK ON OK TO CLOSE THE DIALOG BOX. 


STEP 5. TO WRITE IN HINDI PRESS ALT + SHIFT KEYS TOGETHER RESULT WILL BE VISIBLE ON THE TASK BAR.


NOTE : विण्डोज में हिन्दी टाइप करने की डिफाल्ट पद्धति इनस्क्रिप्ट होती है। AND THIS IS ALSO USEFUL FOR SSC EXAMS.

KEYBOARD LAYOUT OF INSCRIPT KEYBOARD


HAPPY HINDI TYPING FRIENDS...

HOW TO TYPE IN URDU IN WINDOWS CLICK HERE

TOLL FREE NUMBERS FOR HP, WD AND DELL CLICK HARE

HOW TO EJECT DVD R/W TRAY USING COMMAND PROMPT CLICK HERE

HOW TO SEE BHULEKH OF YOUR CLICK HERE

HOW TO BLOCK WEBSITE ON YOUR PC CLICK HERE


How to Solve Problem Browsing with Internet Explorer?
इण्टरनेट एक्सप्लोरर को  रीसेट करना

STEP 1. Open Control Panel


STEP 2.Open Internet Options.


STEP 3. Follow the Steps Below.


STEP 4. Follow The Steps Below,,


STEP 5.Click On Close.


STEP 6.Happy Browsing


FEEL LUCKY


Download it in GIF Format


How to Recharge Your Mobile Online.. Click Here

How to Block A Website On YOur PC Click Here


Friday, January 2, 2015


How to Convert FAT File System to NTFS File System
FAT फाइल सिस्टम को NTFS में बदलना

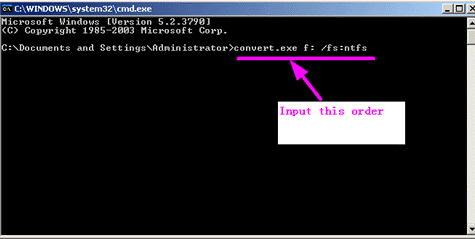
1. Open CMD Prompt By typing cmd in run.

2. Check for Errors On Drive by typing this command (E.g. Pendrive)

       Chkdsk H:

3. Type this command on cmd prompt for conversion.

        Convert H: /FS:NTFS


Note : Coverting NTFS File System to Fat File May Causes your Data Loss

If you forcely want to convert NTFS File System to Fat File System Without Data Loss use easeus partition manager. You Can Download It Here.

How to Manage User Accounts Using Command Prompt Click Here

How to Solve Certificate Error Of Internet Explorer Click Here

How to Format Your PC Using Pendrive Click Here


How to recharge Your Mobile Online 

अॉनलाइन मोबाइल रीचार्ज करें Click Here

Pay Your Electricity Bill Online Click Here
Know Your Pan Card Status Click Here


Pay Your Electricity Bill Online
बिजली का बिल अॉनलाइन जमा करना Click Here

How to recharge Your Mobile Online Click Here

Know Your Pan Card Status Click Here


How to Eject DVD Writer Tray Using Command Prompt

डी.वी.डी. राइटर के ट्रे को कमाण्ड प्राम्प्ट के द्वारा बाहर निकालना


Step 1. Download NirCmd Tool. Click Here

Step 2. Extract The Downloaded File.

Step 3. Copy NirCmd.exe File to Windows Directory.

Step 4. Run The Below Command.

      nircmd.exe cdrom open j:


Result : CD ROM Drive Tray will be Ejected.

Step 6. To Close CD ROM Drive Tray Use the Below Command.

       nircmd.exe cdrom open j:


Result : CD ROM Drive Tray will be Closed.

Note: Here J: is Drive Letter Of CD ROM

The Second Command Will Not Work On Laptops Because There is no Motor In The CD ROM Drive to Close the Tray.

How to view trains in next 2 Hours from your Desired Station Click Here

How to create Bootable Pendrive using Command Prompt Click Here

Toll Free Numbers...Dell, hp, WD Customer Support
टोल फ्री नम्बर लिस्ट
DELL:


HP:


WD:

Download Driver For Your Laptop Click Here

Download Driver For Your Desktop Click Here


How to Manage User Accounts through Command Prompt...
कमाण्ड प्राम्प्ट के द्वारा यूजर अकाउण्ट मैनेज करना।
Open cmd prompt with admin privilege... 
& run following commands.

COMMAND ACTION
net user lists all user accounts.
net user username details about specific user
net user username password /add create new user a/c
net user username newpassword change user password
net user username * /add create user a/c with hidden password
net user username /active:yes enable user a/c
net user username /active:no disable user a/c
net localgroup lists all groups
net localgroup groupname details of a specific group
net localgroup groupname /add create a new group
net localgroup groupname username /add move user to a group
net localgroup groupname username /del  remove user from a group


Feel Lucky...


How to connect Devices Using Wireless to Your PC? Click Here

How to Change Default Boot OS On The Boot Screen?  Click Here


How to Connect Devices to Your PC Using Wireless in Win 8/8.1
How To Create Ad-hoc Wireless Network in Win 8/8.1 Using Command Prompt
एड हॉक वायरलेस नेटवर्क क्रिएट करना विण्डोज  8/8.1 पर


Step 1:- Open the Command Prompt with Administrator priviledge.

Step 2:- Type the following cmd to ensure that ur network interface supports Hosted Network feature

                    
netsh wlan show drivers

Step 3:- Run this cmd to configure wifi adhoc connection

            
 netsh wlan set hostednetwork mode=allow ssid=<ur name> key=<password>

Step 4:- Run the following command to start it.

             
netsh wlan start hostednetwork
There You Go... Your new network is ready to use

What is the difference between Celeron & Pentium? Click Here


How to solve Certificate Error Of Internet Explorer
सर्टिफिकेट एरर को दूर करें।

If u r facing this type of problem during web browsing.........


then follow these simple steps to solve this.
Step 1:- go to Date/Time Settings.

Step 2:- Change the Time Zone & Date/Time according to current                 Date/Time.

There You Go...

How to use Bluetooth Tethering using Android Click Here


How to Change Default Boot OS On The OS Selection Screen (Boot Screen) On Dual Boot Machine
बूट स्क्रिन पर डिफाल्ट अॉपरेटिंग सिस्टम चेंज करना।

1. check for dual booting by using msconfig command in run.

It will open system configuration utility where you can see two entries for dual boot machine.

2. Select The Operating System Which You Want To Be Selected By Default At Boot Screen
3. Now Click On The Set As Default Button On System Configuration Utility.

Here You Go...

How to Change Operating System Name On Boot Screen Click Here


Connect to internet using android Bluetooth on Computer
एण्ड्राएड मोबाइल के ब्लूटूथ के द्वारा कम्प्यूटर पर इण्टरनेट  ब्राउज करें।
Bluetooth Tethering

Connect internet from Computer to android using Bluetooth Tethering. No need for any PC suite or USB cable to connect and access internet in PC or laptop. Tethering is one of the feature of Android mobile, which makes it possible. Tethering means actually we can share the internet connection of mobile phone with other device using WiFi connectivity, USB connectivity or Bluetooth. Android mobile offers to Tether over USB, Tether Over Wifi or Tether over Bluetooth. So Why Tether over Bluetooth? WiFi drains battery in relatively short time, as compare to Bluetooth and USB grabs your phone to stick to a fixed position, soBluetooth tether is an another alternative to WiFi and USB tethering. You can also check for Connecting android internet to other mobile by tethering. Below are the steps to connect internet with Bluetooth tethering, but before implement the steps, ensure that your computer or laptop should have Bluetooth device with installed Bluetooth driver and is functioning properly.

Note: Bluetooth Tethering is included after Android 4.0 i.e Ice Cream Sandwich versionas a in-built feature
Connect internet from Computer to android using Bluetooth Tethering

Steps to Connect internet from Computer to android using Bluetooth Tethering
1.) Turn on your Computer or laptop Bluetooth on and ensure that it is capable to discover all other            devices within a range.
2.) Enable your data packet and see if your internet is working fine in your android mobile, by checking        opening web pages in your phone browser.
3.) Tap to settings in your android device and select wireless and networks. Tap on toTethering            and portable hotspot i.e Setting -> Wireless and networks -> Tethering and portable                  hotspot. Select Bluetooth tethering check box as shown below.

Note: Also ensure that your Bluetooth Device is visible. If not then, make it visible byselecting check box Visible corresponding to your mobile name, present in Setting -> wireless and setting -> Bluetooth as shown.

4.) Now move on to your computer or laptop to make couple of steps. Open control panel (For windows PC, Press window key then control panel) and select Devices and printer link to add your Bluetooth enabled android device, by pressing Add Devices button appearing in the above of window bar.

5.) In the opened up window, you can see your android mobile device which has Bluetooth On. Now select that device and then press next button. Let the device get paired with your computer or laptop.

6.) Last step. In the same window i.e in Devices and printer, select the device and right click on it, where you can see the option to Connect with internet access. Once you clicked it, you are ready to go to access internet in few seconds in your Personal computer from your mobile device.

Now Open browser and Browse Internet...

Get System Details Using Command Prompt Click Here


How to Get System Details Using Command Prompt
कमाण्ड प्राम्प्ट के द्वारा कम्प्यूटर की डीटेल जानें

Take the WMIC command, for instance. It has astonishing scope and a huge set of features: the program can return useful information about your system, control running programs and generally manage just about every aspect of your PC -- all from the command line or a convenient shortcut.

Open The Command Prompt With Administrator Priveledge. To do this...Press Start > Type cmd > Press Ctrl+Alt+Enter Key At Once

If This will ask Yes/No then Select Yes... & There You go


To know the detail of the motherboard or PC 

wmic baseboard get product,manufacturer
wmic bios get name
wmic BIOS get serialnumber
wmic product list brief
wmic service list brief
wmic process list brief
wmic startup list brief
wmic service get /format:hform > d:\services.html
wmic product get name
wmic product where name="mspaint" call uninstall
wmic process where name="iexplore.exe" call terminate
wmic process where name="notepad.exe" call setpriority 64
wmic /node:jetking-pc service list brief

Do You Want to Use Graphical Interface for the Same Purpose? click Here

How to Block a Website On Your PC Click Here


Bhulekh for u...
भूलेख देखें

http://bhulekh.up.nic.in/

ATM Safety Precautions? Click here
How to Change Name Of The Operating System On Boot Screen Click Here
A one-point source to access all Indian Government Websites at all levels and from all sectors... Click Here


ATM Safety Tips

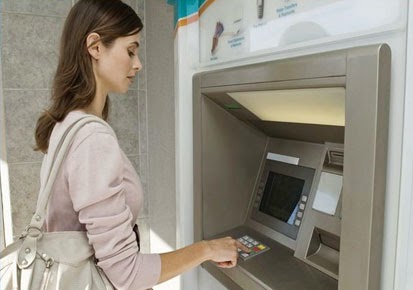
Precautions while using an ATM:-
ए.टी.एम. कार्ड प्रयोग करते समय सावधानियाँ

1.  Memorize your PIN. Do not write it down anywhere,and certainly never
    on the card itself
2. Your card is for your own personal use. Do not share your PIN or card
    with anyone, not even your friends or family

3. "Shoulder surfer" can peep at your PIN as you enter it. So stand close
    to the ATM machine and use your body and hand to shield the keypad
    as you enter the PIN

4. Do not take help from strangers for using the ATM card or handling your cash
5. Press the 'Cancel' key before moving away from the ATM. Remember to 
    take your card and transaction slip with you

6. If you take transaction slip, shred it immediately after use
7. If your ATM card is lost or stolen, report it to your card-issuing bank 
    immediately
8. When you deposit a cheque or card into your ATM, check the credit 
    entry in your account after a couple of days. If there is any discrepancy,
    report it to your bank
9. If your card gets stuck in the ATM, or if cash is not dispensed after you 
    having keyed in a transaction,call your bank immediately
10. If you have any complaint about your ATM/Debit/Credit card transaction 
     at an ATM, you must take it up with the bank that issued the card to you.
What Is Skimming?

Skimming is an act of stealing information through the magnetic strip on the cards that are used in ATMs and merchant establishments. Fraudsters collect information from a credit/debit/ATM card by reading the magnetic strip on the reverse of the card. For doing this, they conceal a small device in the card slot of ATM's or merchant payment terminals. This 'skimmer' scans the card details and stores its information. A tiny strategically positioned camera may also be used to capture the PIN. Skimming can occur in ATMs, restaurants, shops or other locations.

How The Fraudsters Operate?
·                     At ATM machines
Fraudsters insert a skimming device to the ATM's card slot. This device scans the card and stores its associated information. While a customer keys in his PIN, the wireless skimming device transfers the data to the fraudsters. This information is then used by the fraudsters for online shopping or to make counterfeit credit cards.


·                     At Restaurants / Shopping Outlets
At restaurants and shopping outlets, the credit card is swiped twice, once for the regular transaction and the other in the skimmer that captures the personal information which is retrieved later by the fraudsters.

Tips To Protect Yourself From Skimming


Tips to Avoid Skimming

·        Protect your PIN by standing close to the ATM and shielding or cover the key pad
      with your other hand when entering your PIN
·          If you see anything unusual, strange, suspicious, something that does not look
      right with the ATM or if the keypad does not feel securely attached, stop your
      transaction and inform the bank
·          If it appears to have anything stuck onto the card slot or key pad, do not use it.
      Cancel the transaction and walk away. Never try to remove suspicious devices
·          Be cautious if strangers offer to help you at an ATM, even if your card is stuck
      or you are having difficulties. Do not allow anyone to distract you
·         Keep your PIN a secret. Never reveal it to anyone, even to someone who claims
      to be calling from your bank or a police officer
·         Check that other people in the queue are at reasonable distance away from you
·         Regularly check your account balance and bank statements, and report any
      discrepancies to your bank immediately

Below are additional tips for staying safe when using an ATM:

·   Memorise your PIN – never write it down or store it with your card(s)
·   Have your card and envelopes ready for your transaction when you
     approach the ATM
·   Be aware of your surroundings and people nearby
·   Monitor your account, statements and report suspicious transactions
     to the bank
·   Do not take help offered by strangers or allow anyone watch you enter
     your PIN
·   Always press the 'Cancel' button once your transaction is over.

How to Block Website On Your PC Click Here

How to Create Bootable Pendrive Using Command Prompt Click Here