Saturday, February 28, 2015

HOW TO RESTRICT USERS TO CHANGE YOUR SYSTEM PASSWORD

विण्डोज का पासवर्ड चेन्ज होने से बचायें ?


 If you want to make your windows password safe I mean anyone is not able to change your password or when it is modified you can back your password easily. Here I am going to explain the step by step process of password reset/recovery...

Step 1:-
 Open any drive & create a notepad file.


Step 2:- Right Click on that Notepad file and click on Edit. Notepad file will open again.


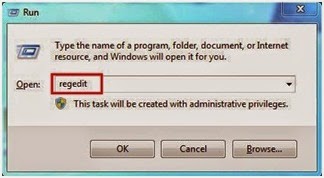
Step 3:- Go to Run and type lusrmgr.msc to open Local Users & Groups.


Double click on Users node to get all users list of your machine.


Suppose you want to reset administrator account.
Step 4:- Then go back to notepad file which is open in step 2.


And type the Net User command,
The above command will change the administrator password to 123@qwe.
Step 5:- Now go to File Menu > Save As & save that file with anyname.bat extension


Remember the location of your Batch file in my example it is F:\reset.bat


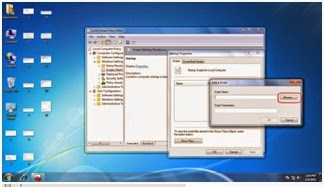
Step 6:- Now go to Run & type gpedit.msc to open Group Policy Editor window.


Step 7:- Go to Computer Configuration > Windows Settings > Scripts.
Double Click on Scripts to open scripts node.


Double Click on Startup, It will open a new window, and click on Add Button to add the Batch file you created in earlier steps.


on clicking on Add button a Browse window will open,


Select the Batch file to add in startup scripts,


Step 7:- Go to Run and type gpupdate /force command to update the group policy.

After following the above steps when anyone is going to change your account password, he will be able to change but after restarting the machine that script will run and net user command will reset your password to 123@qwe.


HOW TO TROUBLESHOOT DOMAIN LOGIN ISSUE


डोमेन में यूजर लॉगिन में समस्या का समाधान ?

If your machine is the member of a domain network and there is no response from server or server is not responsive at login time then how to troubleshoot that issue.

Press Ctrl+Alt+Delete at the above screen.


Here Maurya.com is the Domain name and Sunil is the user name, Click on Switch User button...


click on other user...


It will open a dialog box and it shows the local pc name in my example its NADEEM-PC click on OK and usePCNAME\USERNAME format for login...


Type Local username and password to login...


After login to local user account (Account on your machine) go to Computer properties > Change Settings...


On clicking change settings System Properties dialog box will open click on Change Button...


After clicking on change button it will show domain name, click on Workgroup radio button & typeWORKGROUP...


In above image system is notifying you to leave from domain and join workgroup...


After Restarting the machine you can login with local account.

HOW TO DISABLE WINDOWS 8 AUTOMATIC ACTIVATION

विण्डोज 8 के ऑटोमेटिक एक्टिवेशन को डिसेबल करें कैसे ?


Step1:- Open Run & type regedit


Step2:- Go to HKEY LOCAL MACHINE > SOFTWARE > MICROSOFT > WINDOWS NT > CURRENT VERSION > SOFTWARE PROTECTION PLATEFORM > ACTIVATION


Step 3:- Double click on MANUAL & set value to 1.


HOW TO USE DISK QUOTA TO LIMIT THE DRIVE SPACE

डिस्क कोटा का यूज कैसे करें।


Disk Quota is a limit set by system administrator for standard users to use the disk space of a system. It is only available with NTFS file system.
     Here I am going to explain the step by step process of disk quota for user1 in my system.


Login with administrator account and Go to the target drive on which you want to configure quota suppose it is E: drive.


 Right Click on E Drive & select Properties.


 Go To Quota Tab & Select all check box available and provide disk usage limit in the box.


I have provided 100 MB limit and 80 Warning level, click on Apply button & click on Quota Entries button.


after clicking on quota entries button quota entries dialog box will open before you. click on new quota entrybutton from tollbar now it will open select users as given in following screens.


In above dialog box type the username to which you want to restrict disk usage. in my example it is user1.


select Ok and close the quota entries dialog box and close the quota management dialog box also.


and after closing all dialog boxes log off from administrator account and login with user1 and try to put files larger than 100 MB it will popup a message.


HOW TO DO PARTITION OF YOUR PENDRIVE

पेनड्राइव का पार्टीशन कैसे करें।


Doing so, you can create multiple partitions and store your private data on it. Only the first partition will be visible, and the other partitions will not show up on any other PC, but your own and also you can avoid viruses affecting this data when plugged in on another computer.To do this, all you need is a simple universal USB pen drive driver, which can be downloaded from ‘http://www.mediafire.com/?oqlgdvcymzz’. Download the archive, uncompress it to a folder on your desktop and get started. Don’t forget to backup the contents of your pen drive, as it will format it.
Step 1: Plug in your pen drive into your PC’s USB port. Next, right-click on ‘My Computer’ and click on ‘Manage’ in the context menu. Click on ‘Device Manager’ on the left pane. This will show all the hardware devices connected to your PC. Now, on the right pane, scroll down to ‘Disk Drives’ and you should see your pen drive connected here. Right-click on the pen drive and select ‘Properties’.

 Selecting properties for the flash drive
Step 2: In the properties window that just opened, click on the ‘Details’ tab. From the scroll down menu under ‘Property’, choose ‘Device Instance Path’. You should see a string of characters highlighted in the ‘Value’ window below, which should read something like ‘USBSTORDISK&VEN_&PROD…..’ Right-click on this value and select ‘Copy’. Now close all the windows without saving changes.

Selecting the Device Instance Path
Step 3: Now open the folder that you uncompressed after downloading the universal USB flash drive driver. In this folder, find and open the file named ‘cfadisk.inf’ in ‘Notepad’ or any test editor you prefer (Notepad++ is ideal to be used here’ (download from ‘notepad-plus-plus.org’).
Modifying the flash driver
Step 4: Now locate the words ‘device_instance_id_goes_here’, which is available on line 26. You need to replace these words with the string you just copied to the clipboard from the Device Manager. Save the file and close the editor.
Step 5: Now go back to the ‘Device Manager’ page (repeat step 1). This time click on the ‘Driver’ tab and click the button ‘Update driver’
Switching to the updated driver

Step 6: On the next window, choose ‘Browse my computer for driver software’ when the system asks how you want to search for the driver software. Then on the next window, choose ‘Let me pick from a list of drivers …. ‘. 
Step 7: On the next window, uncheck the box ‘Show compatible hardware’ and click on the ‘Have disk button’. Now click on ‘Browse’ and from the universal USB driver folder on your desktop select the ‘cfadisk.inf’ file and click on the ‘Open button’, followed by the ‘OK’ and then ‘Next’ buttons on the previous windows.
Step 8: An update driver warning message should show up stating that you are trying to install a driver, which is not compatible with your hardware. Ignore the message and click on ‘Yes’. The system will start installing the driver and show up another warning that the driver is not a verified or authentic driver. Ignore this one message and click on ‘Install this driver software anyway’. Let the system update the driver and you shall receive a message of a successful driver update. 
Windows security warning for the driver
Note: You can use this modified driver for this pen drive only. To use another pen drive, you will need to do the whole process again.
Step 9: That’s all you needed to do. Now once you are back to the ‘Computer Management’ window, click on ‘Disk Management’ from the left pane and start partitioning your pen drive as you would with a regular hard drive. You can create multiple partitions and format them, accordingly. 
Partiitioning the flash drive, like you would a hard drive
Note: You can access all the partitions on the pen drive only from your PC. Other PCs will only be able to see the first partition and the rest will be unavailable. Make a copy of the driver on the first partition of the pen drive and you can install it on other PCs, in case you need to access the other partitions.
This way, you can plug in the pen drive on your friend’s PCs without worrying about your private data. To reset everything back to the way it was, simply delete the partitions completely and uninstall/delete the driver for the pen drive from the Device Manager.